How to Make a Jedi Robe
Last Halloween we made 4 Jedi robes to go with some Star Wars masks we bought. These are the instructions to make the robes. We wanted to make the robes with as few pieces of fabric and as little sewing as possible. I had never made anything resembling clothing before so patterns from the store were out of the question (too complicated). When you make your robe, think of it as a Mexican poncho that goes over your head, rests on your shoulders and happens to be sewn up the sides to make sleeves.
The Jedi Robe

- Buy some extra wide brown polyester fabric. 72" wide (or however wide your arms are stretched out). You will need a lot. Buy a whole bolt of it. Go to Wal-Mart. I got my fabric there from a bargain bin for $2/yard. If you can't find fabric wide enough, you will have to add extensions to the sleeves.
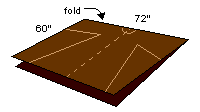
- Figure out how tall you are at the shoulder. Double that number and cut that much fabric off of the bolt. If you are 5 feet tall (60") at the shoulder, cut 10 feet (120") off of the bolt.
- Spread the fabric out on the floor folding it over on itself width-wise.
- Lay down on the fabric with your arms stretched out and your shoulders at the fold in the fabric. Have someone trace around you. Don't trace too close to the body or else the robe will not flow right.
- Pin the two layers of fabric together along the trace line.
- Cut the traced shape out of the fabric about an inch outside of the trace line.
- Sew along the trace lines.
- Turn the robe inside out.
- Make the front opening of the robe by cutting a line straight up the middle of the front of the robe to the shoulder fold. Make sure you only cut up the front of the robe.
- Try the robe on to make sure the measurements are OK.
- Hem the edges along the bottom of the robe, the ends of the sleeves, and the edges of the front opening. If you don't hem these edges, your robe will look really cheap and you will end up with a lot of little threads all over the house.
The Jedi Robe Hood
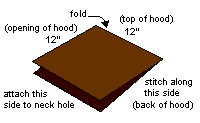
 This part was a little tricky to figure out. It took a few paper mock-ups to figure out how to make a hood shape. In the end, it was simple: one rectangular piece of fabric, folded in half, with one side stitched up.
- Cut a 1 foot by 2 foot rectangle of fabric. (Some readers have mentioned that this size hood seems too small. For a larger hood use a 16" by 32" or larger piece of fabric.)
- Fold it in half to make a 1 foot square piece of fabric. (16" square if you used a bigger piece of fabric.)
- Sew one edge from the fold to the end.
- Turn the hood inside out.
Attach the Hood to the Robe
- Prepare the robe by cutting a 6 inch circular neck hole out of the robe centered around the top of the front slit. Discard the circular piece of fabric. The hood will be sewn to the circular hole you just cut.
- Align the seam you stitched up the back of the hood to the center of the back on the neck hole.
- Sew the two ends of the hood rectangle to the left and right sides of the neck hole. Depending on how big you made the neck hole, the edge of the hood may be too big for the neck hole. If this happens, just put a couple of pleats in when you attach the hood.
- Hem the front edge of the hood.
- The hood will look WAY too big, but that is how the Jedi robe hoods are.

No comments:
Post a Comment